Friday, September 23, 2011
The Fringe Festival
My animated loops I submitted to loopdeloop.org will now be showing at the Fringe Festival in Melbourne, AU. If you are able to go, please have fun, let me know how it was and send pics!

Monday, September 19, 2011


Saturday, September 17, 2011
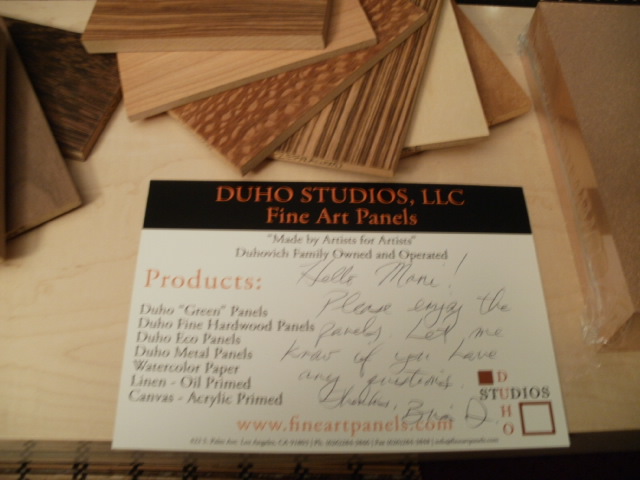
On metal (like copper) materials as surfaces and foundation for oil painting and more...
Hello Mani,
Our Metal Line Panels have been prepared leaving the surface in a raw state. The metal panels have been sanded leaving an open tooth and cleaned ready for your choice of medium. Leave the wrapped metal panel in it's original packaging until you're ready to paint. Copper and Brass metals have an increased sensitivity to moisture, oils and it's environment. We suggest that you handle the panel wearing gloves, because oils in skin or natural elements in the environment could leave blemishes. Some Artists will paint directly onto the surface of the metal. Some Artists do some grinding and easy hammering creating different effects. If copper is left untreated, Artists will be able to create beautiful patinas on the copper surfaces.
We recommend using a clear primer. Once a primer is applied the metal can be touched or left open in your studio without worry of tarnish. Many fine art stores can offer you information depending upon your type of paint manufacturer. If your brand of paint does not make a primer for their paints there are many products on the market such as: Krylon, Golden GAC 200, Lascaux, as examples. We prefer using an industrial product: X-I-M 400 Clear which is a primer, sealer and bonder in one. The spray can is easy to use and the application leaves an even coat. This product can be purchased via internet. Most all mediums, oil paints, acrylics, enamels, inks are compatible with metals. If you're using the metal panel as an ink jet print format there's a product called inkAID Clear which is an excellent printing primer product.
When your Artwork has completely dried use an UV Varnish. Try a fine art store to purchase a varnish to suit your needs. Or a fine hardware store in your area should be able to assist you. Should your artwork be mainly the metal that you are working on use an UV Varnish, such as Copper Shield, Permalac Spray Lacquer. Follow manufacturers instructions and apply at least 3 - 4 coats to front, sides and back of your artwork.
Don't be afraid working on our metal panels. If an area is not coming out very well, use an painting knife to scrap off paint, OMS, or even a very fine sandpaper can remove paint down to the original metal surface. For some blemishes/finger prints try using a metal cleaner such as, Brasso Metal Polish which cleans and polishes quite well. Use a soft clean cotton cloth and use the product on the blemished area end to end. Do not submerge the panel in water, over saturation will compromise the substrate. If further assistance is needed with this we can resurface the Metal Panel for you for a nominal fee.
Capture the nature beauty and illuminate your subject matter as not other canvas can do. So enjoy the experience painting on metal as the ultimate of all substrates.
Please don't hesitate to call me if you have any questions or concerns.
Sincerely,
Barbara
Duho Studios, LLC
Fine Art Panels
Thursday, September 15, 2011
Extreme Wood Branding

So I got the Dremel Versa Tip off Amazon for like $20 something and it arrived today in the mail. I tore into the packaging like a lion on a limping gisele and proceeded to fool around with it for an hour to get a feel for it. Softer wood seems to yield better to it. Make sure you have a well ventilated area to do it. My kitchen now smells like Rhode Island in October. It's a very sugary burn smell. Doesn't bother me but other people it might. It came with a bunch of tips and can work with plastic and metal (not just wood). The markings are deep so it's safe to say that no one can claim your work with this in your belt. They would have to chip it out without destroying the art. No need to thank me. Purchasing my art will do.

Here's the back of the purpleheart panel (Ochun's Pregnant) signed and dated. I messed up the date so I just added the one...Oops! Ya, I need more practicing but it's pretty cool. Also you can now see how the varnish looks vs unvarnished in the pictures below. Again, I encourage feedback and a dialogue from other fellow artists. And if you have a story or product you're so happy with that's made your artistic life easier, please feel free to leave a comment or contact me.


Beautiful Package from Duho Studios
In conjunction with my three 5x7's of maple, purpleheart and bloodwood, my 10x20 maple and 5x7 copper panel came in today from Duho Studios along with sample panels of all kinds! They were nice enough to add it to fool around with at my leisure. Awesomeness! I am so happy Audrey Kawasaki recommended them to me ^.^


 BTW! Quick tip before I forget. When I was using the purple heart, the varnish I used to seal my charcoal drawing (Ochun's Pregnant) was Krylon's UV Archival Varnish Gloss. It made the blacks and whites pop and the purpleheart deeper. I sprayed 3 coats waiting 15-20mins in between to dry. The wood is very dry so it absorb the first coat fast. It left a very nice shiny finish and best part - I don't have to worry about the drawing budging. You can run your hand over it all day and it be fine.
 Duho recommended any UV or fixative sprays will work if you want to keep a matte finish instead of polished. This is the one they tested for me:
Sennelier's Fixatif Delacroix Fixative Spray - "It worked great. The purpleheart did darken when we sprayed it on but then it dried to the normal appearance and sealed the charcoal so that it does not smear...good stuff." -Brian Duhovich
Brian also recommends:
"No, you do not need to gesso the wood before starting, but we do recommend a UV varnish when you're done. Just do not over saturate the wood with solvents and such. Some artists like to put a clear gesso on before they paint (for tooth), but it is personal preference. I think this is done mainly because the wood will darken a little when a liquid is applied, changing the tone a bit. To give an idea of what the wood will look like when the varnish is applied, get dab of water and rub it on the wood. Don't worry the wood will dry back to normal, but it will give you an idea of what the wood will look like after the varnish is applied."
Tuesday, September 13, 2011


Monday, September 12, 2011
Digable Arts Fest

Friday, September 9, 2011


Saturday, September 3, 2011


Subscribe to:
Posts (Atom)